
| 1 – What is Azure Automation DSC? |
| 2 – Azure DSC Components |
| 3 – Why Use Azure DSC? |
| 4 – Deploying Azure DSC |
Powershell DSC is a tool that allows you to manage your IT and development infrastructure with configuration as code. This tool was brought to the cloud to help you configuring your servers, standardize them and to avoid configuration drifts, even if they are hosted in different cloud providers. Let’s find out more about this tool.
1 – What is Azure Automation DSC?
It is a configuration management service for DSC (Desired State Configuration) nodes, they can be either physical or virtual machines. You can orchestrate the nodes using configurations that checks the computer nodes constantly. While on Powershell DSC you need to configure your own pull server, Azure has its own DSC pull server to apply the configurations automatically, you don’t need to manage another server to take advantage of this feature.
Azure Automation has the pull model only, which means the nodes need to report to the Azure server to take their configuration to apply. The LCM (Local Configuration Manager) checks for compliance with the automation account, and if required, it pulls the new configuration to the server.
The Local Configuration Manager (LCM) is the engine of Desired State Configuration (DSC). The LCM runs on every target node, and is responsible for parsing and enacting configurations that are sent to the node.
Here we have a simple representation on how it works:
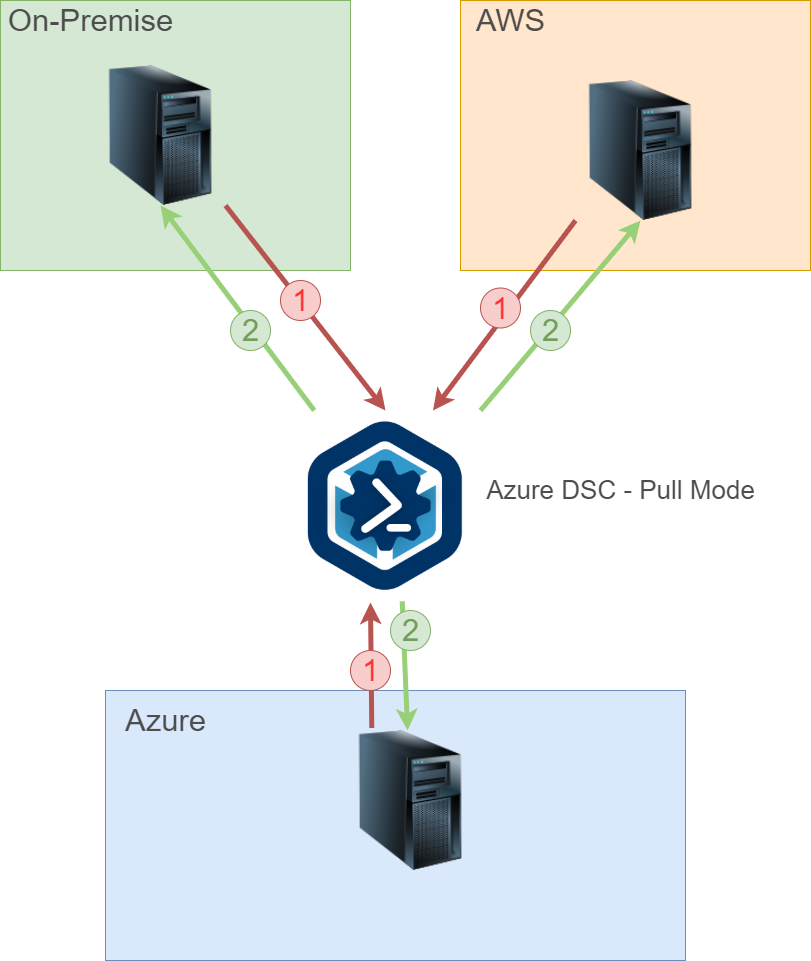
We can have virtual machines running on Azure, on-premise, or even another clouds, as long as the server has the proper internet connection to request/download the configuration files.
Here are some things you need to be aware before deploying it:
- Port: Only TCP 443 required for outbound internet access
- Global URL: *.azure-automation.net
- Global URL of US Gov Virginia: *.azure-automation.us
- Agent service: https://<workspaceId>.agentsvc.azure-automation.net
2 – Azure DSC Components
Here we have a list of the main components, which are necessary for Azure DSC to run properly:
Nodes – Every computer that pulls configuration from this automation account:

DSC Configurations – The scripts themselves, when you upload them to Azure, which contains the configuration steps for the nodes to follow:

DSC Node Configurations – The configuration after compiling them on Azure, it usually comes with the name you set on the DSC Configuration script;

As you can see in the previous image, we have the configuration in red and the compiled configuration in orange, the configuration was discovered during the DSC configuration file compilation, and then you have the ability to assign one configuration or another to the server.
3 – Why Use Azure DSC?
We have several benefits by using this tool, we can list some of them on the table below:
- Simplify Administrative Tasks – You have the ability to configure one or more resources on your servers automatically;
- Configure Servers Identically – By standardizing them, this will help you to reduce the support costs;
- Remediate Unsanctioned Changes – This will prevent configuration drifts;
- Simple and Automated Deploy – You can deploy on your private, hybrid and public clouds;
4 – Deploying Azure DSC
Starting with the basics, The Azure DSC is a feature inside the automation account, let’s deploy one:
 4.1 – Automation Account
On your Azure account, search for “Automation Account” and click “Add“.
You will get the following screen:

Give it a ‘name‘, select the ‘subscription‘, the ‘resource group‘, the ‘location‘, and if you want to create an ‘Azure run As account‘, this one is used to authenticate in your Azure AD in case you want to manage the resources using Automation runbooks, which is not our case, but we’ll leave this option as default (yes).
Powershell Equivalent:
$resourceGroup = "Cloudshell-DSC"
$AutomationACCName = "Cloudshell-DSC"
$location = "eastus"

#To Connect to your account
Connect-AzAccount

#To Create a new Resource Group
New-AzResourceGroup -Name $resourceGroup -Location $location

#To create a new Automation Account
New-AzAutomationAccount -Name $AutomationACCName -ResourceGroupName $resourceGroup -Location $location
4.2 – Uploading a Configuration file to the account
Now that we have an Automation Account, we will be able to upload our configuration to be pulled by the servers. Note that the automation account has a lot of options, which is not intended to be presented here, in this post we are going to focus only on the DSC feature.
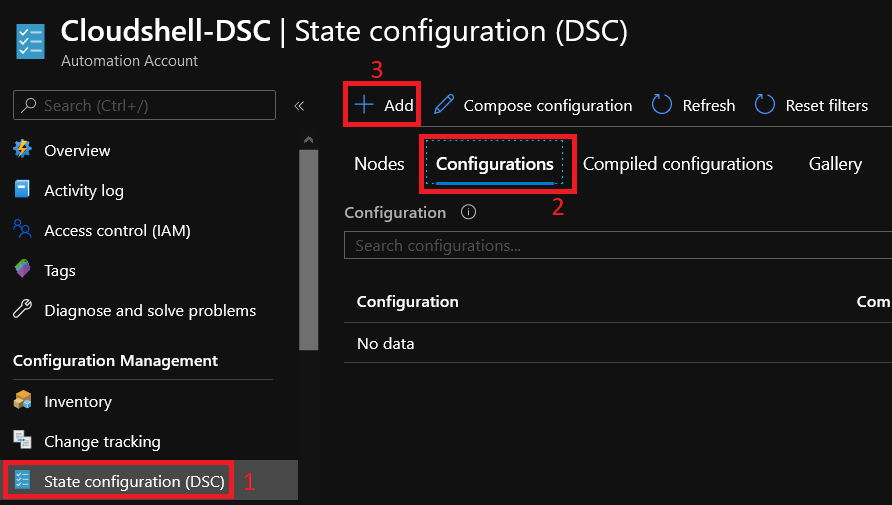
Search for the State Configuration (DSC) option, click on ‘Configurations‘ tab and hit “Add“:
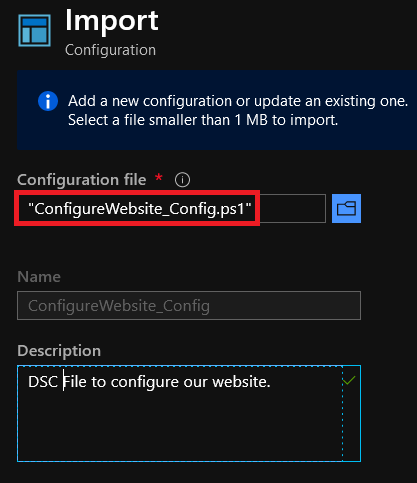
In the next screen, you have to upload your configuration file to Azure. The configuration file is as follows:
#Everything that is inside of this block will be processed by this configuration file when compiled

configuration ConfigureWebsite_Config
{

    #Extending the DSC Resources modules by importing some resources that will be used in this script
    Import-DscResource -ModuleName xWebAdministration
    Import-DscResource -ModuleName xPSDesiredStateConfiguration

    $DestinationPath = "C:\temp\TechWebsite.zip"
    $Uri = 'https://codeload.github.com/RafaelM1994/TechWebsite/zip/master'
    $UserAgent = [Microsoft.PowerShell.Commands.PSUserAgent]::InternetExplorer
    $Headers = @{
        'Accept-Language' = 'en-US'
    }

    #Node block that will receive the configuration with the instructions, you can either set this to localhost, or give it a proper name to show up correctly in Azure portal
    Node Configure_Website
    {

        #This block will ensure that IIS feature is present on Server
        WindowsFeature 'IIS' {
            Ensure               = "Present"
            Name                 = "Web-Server"
            IncludeAllSubFeature = $true
        }
        #This block will download the website files from Github using the declared variables before
        xRemoteFile 'DownloadFile' {
            DestinationPath = $DestinationPath
            Uri             = $Uri
            UserAgent       = $UserAgent
            Headers         = $Headers
        }

        #This block is going to extract the zip file coming from the Download step
        Archive 'ExtractFile' {
            Ensure      = "Present"
            Path        = $DestinationPath
            Destination = "C:\temp"
        }


        # This resource block ensures that the website content copied to the website root folder.
        File 'WebsiteContent' {
            Ensure          = 'Present' # Present, Absent.
            SourcePath      = 'C:\temp\TechWebsite-master'# File, Directory
            Recurse         = $true # $true, $false
            DestinationPath = 'c:\inetpub\wwwroot'

        }

    }

}
ConfigureWebsite_Config
Upload it by browsing the file directly from your computer:
Hit refresh button and your configuration file will show up:
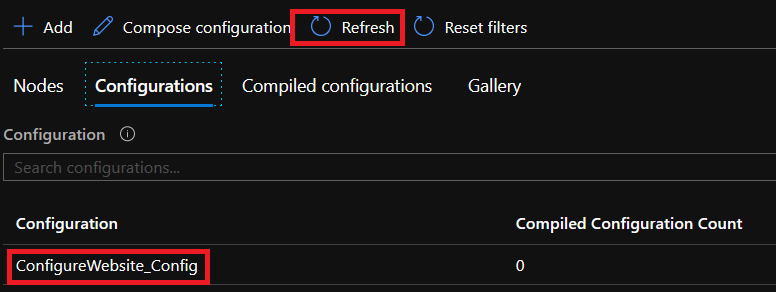
Note that we don’t have any compiled configuration yet. Let’s compile it.
4.3 – Compiling the Configuration File
On Figure 8, you can see your configuration file, click on it to see the next screen:

And here, you just need to click on Compile to start the compilation process. Your compilation request will be queued and started as soon as the pull server is free to compile it.
If you see something like this:
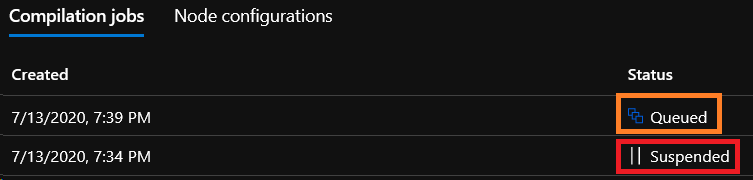
Queued – Compilation process is in the queue to be compiled;
Suspended – The script has any error, you have to find out what’s happening by clicking on the task:

In this case, the exception was caused by the modules that were not imported to our server, when it searches for the module during the runtime, it won’t find it because we haven’t imported it yet. To import the xPSDesiredStateConfiguration, refer to the 4.4 section.
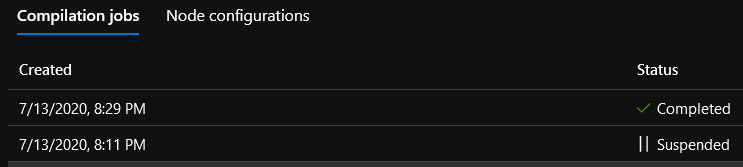
After importing the Resource, compile the Configuration file again.
4.4 – Importing Modules to the Azure Account
Because our script is using xPSDesiredConfiguration resource, which is not built-in, you have to download it from github or import it using the Modules Gallery inside of your Automation Account, in this post we will show only the Modules Gallery method.
Under the “Shared Resources” section, go to Modules Gallery, and search for ‘xpsdesiredstateconfiguration‘:

Click ‘Import’:

For this demo, do the same thing with xWebAdministration module.
You can also take a look at the documentation when you get the chance, you will be redirected to the Github page for that DSC Resource.
Don’t forget to compile the configuration again after importing the modules above.
4.5 – Assigning a Host to the Configuration
Now that we have our configuration compiled successfully, we have to add nodes to be assigned to this configuration.
In this demo, I have one aws server and two vms on my machine:


Let’s take a look on how to do that.
Microsoft has a script to generate DSC metaconfigurations to onboard non-azure vms to our DSC configuration, this metaconfiguration tells the DSC agent to pull from and/or report to Azure Automation State Configuration.
Select the code from that section and paste it into your IDE. You have to edit a few things from the 91 to 103 line:
 # Create the metaconfigurations
 # NOTE: DSC Node Configuration names are case sensitive in the portal.
 # TODO: edit the below as needed for your use case
$Params = @{
     RegistrationUrl = 'Automation Account URL';
     RegistrationKey = 'Automation Account Key';
     ComputerName = @("host1", "host2", "host3");
     NodeConfigurationName = 'ConfigureWebsite_Config.Configure_Website';
     RefreshFrequencyMins = 30;
     ConfigurationModeFrequencyMins = 15;
     RebootNodeIfNeeded = $False;
     AllowModuleOverwrite = $False;
     ConfigurationMode = 'ApplyAndAutoCorrect';
     ActionAfterReboot = 'ContinueConfiguration';
     ReportOnly = $False;  # Set to $True to have machines only report to AA DSC but not pull from it
}
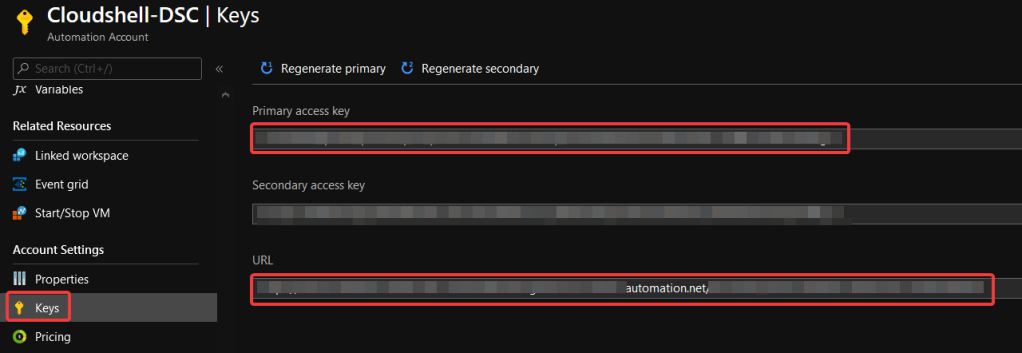
RegistrationUrl – The URL that your servers are going to pull the configuration.
RegistrationKey – The registration key of your automation account.
Go to the “Keys” tab on your automation account to find them:
ComputerName – The DNS name or ip address of your servers. This should be accessible by the computer you will run the apply DSC Configuration command after configuring the meta configs, e.g. your own computer or a server that you use for management on your network. For this demo, I’m using two ips that are two server core vms on my machine as well as an aws server.
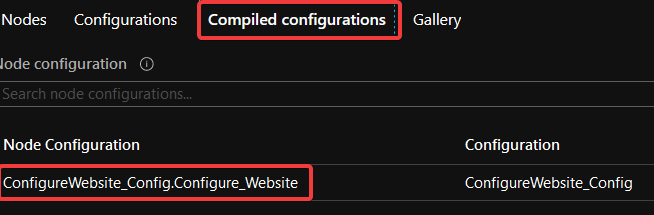
NodeConfigurationName – The compiled configuration name. You can find it on the Compiled configurations tab:
RefreshFrequencyMins – Specifies how often (in minutes) LCM attempts to obtain the configuration from the pull server. If configuration on the pull server differs from the current one on the target node, it is copied to the pending store and applied.
ConfigurationModeFrequencyMins – Specifies how often (in minutes) LCM ensures that the configuration is in the desired state.
RebootNodeIfNeeded – Specifies whether the target node is automatically restarted when configuration requires it.
AllowModuleOverwrite – Specifies whether new modules that are downloaded from a pull server overwrite the old ones.
ConfigurationMode – Specifies how LCM should apply the configuration. Valid values are:
- ApplyOnly: Configuration is applied once.
- ApplyAndMonitor: Configuration is applied, and LCM monitors whether any changes occur. If configuration drift is detected, it is reported in logs.
- ApplyAndAutoCorrect: Configuration is applied, and LCM monitors whether changes occur. If configuration drift is detected, LCM reapplies the configuration.
ActionAfterReboot – You can choose between two values:
- ContinueConfiguration: Continue applying the current configuration after machine reboot. This is the default value.
- StopConfiguration: Stop the current configuration after machine reboot.
ReportOnly – Set to $True to have machines only report to DSC but not pull from it, i.e, you will see the machines in the portal, but they won’t apply the configurations;
After setting up properly all these options, you have prepared the script to create the metadata for each server. To generate the metadata, save this script as a ps1 file, in my case I saved as ‘Generate-MetaConfig-Test.ps1′. After that, simply run it by declaring the full path of the file or entering in the file folder:
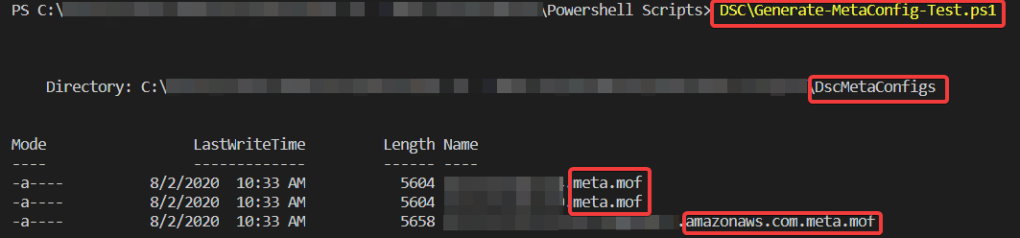
The script will create a folder called ‘DSCMetaConfigs’ and create the meta.mof files of the servers inside of it.
MOF files stands for Managed Object Format and they are used to describe Common Information Model (CIM) classes, these are industry standards which gives us flexibility in working with DSC. In DSC this is important because the MOF files are the artefacts that will actually be used to configure our nodes. We won’t break down any MOF file here because it’s out of scope of this post.
Have in mind that this MOF will be delivered to our target node and used by the Local Configuration Manager (LCM) to configure our nodes.
To apply the meta.mof files to the nodes, you have to run the following:
#If you are in a domain environment, enter your domain admin credentials:
$cred = (Get-Credential ".\Administrator")

#Path to the mof files:
$DSCMetaFilesPath = "C:\path\to\the\files\DscMetaConfigs"

#Apply the Meta files to the servers
Set-DscLocalConfigurationManager -Path $DSCMetaFilesPath  -Credential $cred
After running that, you will see the LCM doing its job:

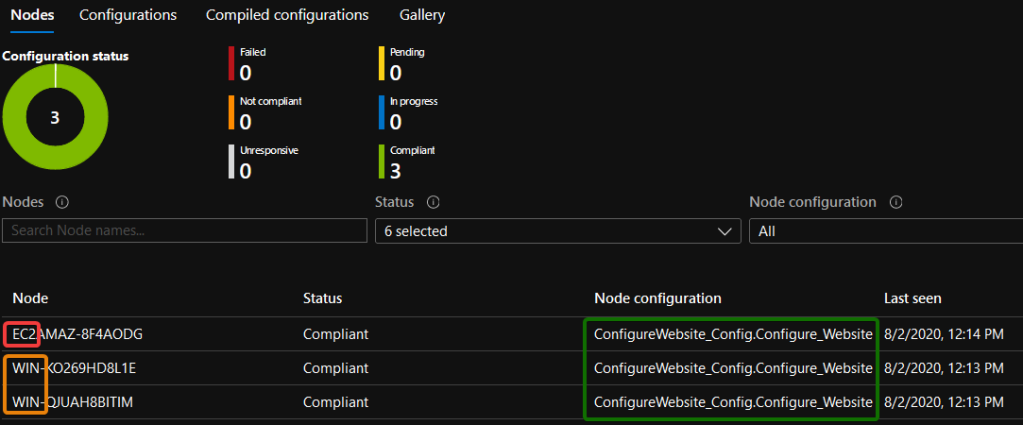
And if you go back to the portal, you will see the nodes that were able to connect to the pull server, what configuration they received, as well as the nodes ‘last seen’, the time stamp where the host communicated with the pull server:
If you click on one of the nodes, you will get the following:
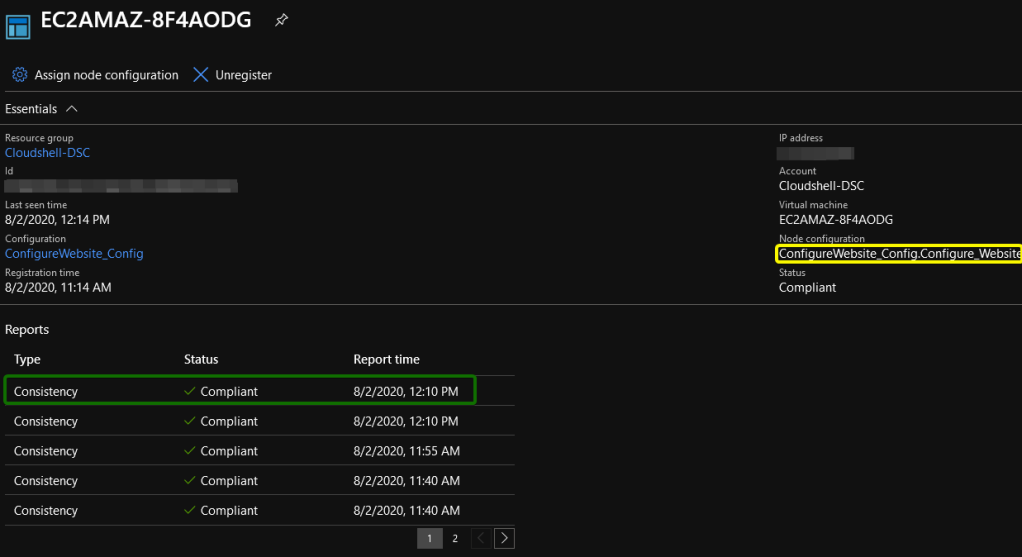
In this screen, you can see whether the configuration is consistent or not, what configuration has been applied, we can unregister certain configuration or even add another node configuration to it.
Our configuration was to pull files of a website from a github repository, extract the zipped download and move the content to inetpub\wwwroot to display the website. If the configuration is compliant, it means the site should be working, let’s test that out:

There we go, a fully website running directly from our server core on AWS.
Same thing for our local vm:

4.6 – Assign an Azure VM to Azure DSC
Now that you understand how the process works under the hood, let’s take a look on how to assign a vm node to our configuration. You will find this process really simple if you took all of the other steps.
Go to your automation account, select State Configuration, Nodes, and click Add:

From here, you have to select a vm that is in “Running” state to be eligible to assign to the DSC Configuration:

Hit the Connect button:

Notice that this screen is similar from what we have configured in the meta configuration script on the 4.5 step. Fill in all the information and hit ‘OK’ button:

You have to wait a few minutes (about 10 min) to see your vm on the nodes screen:

In this post, you’ve learned how to use Azure DSC to standardize your servers that can be on-premise, in other clouds or even Azure vms to use one configuration and to auto-remediate in case of configuration drifts.
This option can be useful when you have a large environment that you need to configure the same way and you need to avoid any mistakes. The tip here is to try with a few servers first, and if the configuration is working as expected, then apply the configuration to the rest of your environment.
I hope you liked it, and I’ll see you in the next post!
