
In a previous post, I was talking about Traffic Manager, but sometimes it could be hard to set up so complex resource to work with geo-distributed applications. That’s where Azure Front Door(FD) comes into play. If you don’t have network expertise, Azure Front Door represents a low entry barrier for geo-distributed applications.
1- What is Azure Front Door?
Azure Front Door helps you to work with global consumer and enterprise applications by providing a way to define, manage and monitor the web traffic to your instances, optimizing for best performance and high availability.
One of the primary benefits of using Azure Front Door is taking advantage of Microsoft’s global network.
Some other key features include:
Smart Health Probes – It monitors your backends for latency and availability to provide quick automatic failover if a backend goes down;
Session Affinity – Using cookie-based session, the traffic from a user session gets directed to the same application backend for processing;
URL Redirection – Automatically redirect any HTTP traffic to HTTPS;
URL Rewrite – Allows you to configure an optional Custom Forwarding Path to use when constructing the request to forward to the backend;
2 – How it works?
It works at layer 7, and similar to the Traffic Manager, it is resilient to failures, including the failure of an entire Azure region.
With Azure Front Door, you can ensure that it is routing your client requests to the fastest and most available application backend.

On figure 1, you can see that the user is coming through the internet to reach Azure FD, it will point the user direct to the correct endpoint based on the best latency possible for the user.
Another thing you can note on the figure 1 is that you basically have three steps to configure:
- Frontend Pool – Specifies a desired subdomain on Front Door’s default domain to route traffic from that host via Front Door. You can also use your own domain. More information about the custom domain, you can find here.
- Backend Pool – A backend pool is a set of resources to which Front Door load balances your client requests.
- Routing Rule – A rule or a set of rules that determines how the traffic coming from the frontend will be redirected to the backend.
From the incoming side, we have the following:
- HTTP Protocols (HTTP/HTTPS)
- Hosts (for example, http://www.foo.com, *.bar.com)
- Paths (for example, /*, /users/*, /file.gif)
The rule first evaluates the match based on HTTP protocol, then Frontend host, then the Path.
3 – Deploying Azure Front Door
In this demo, we’ll use the figure 1 as our reference. Let’s start with the deployment of two App Services and then we focus on the Azure Front Door itself.
 3.1 – Deploying two App Services
Because it’s not our focus here, we’ll not teach you how to deploy a new app service from scratch, instead, we will deploy two web services using Powershell.
To upload a test page to your web apps, you can simply follow my previous post or use the following Powershell code to upload the zip files to each web app:
$EastUSfiles = "C:\Temp\Sites\EastUS"
$Europefiles = "C:\Temp\Sites\WestEurope"
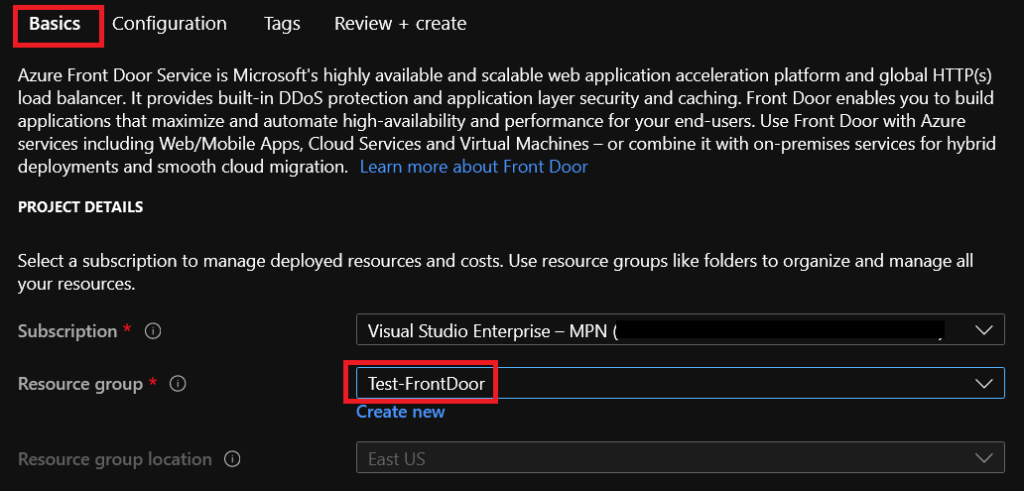
$ResourceGroup = "Test-FrontDoor"
$AppServicePlan = "CloudShellSP"
$location1 = "EastUS"
$location2 = "WestEurope"
#To create a new Resource Group
New-AzResourceGroup -Name $ResourceGroup -Location $location1
$locations = ($location1, $location2)
#To create the WebApps and the App Service Plans
foreach($Location in $locations){
$ASPService = "$AppServicePlan-$location"
#To create the App Service Plan
New-AzAppServicePlan -Name $ASPService -Location $Location -ResourceGroupName $ResourceGroup -Tier "Standard" -NumberofWorkers 2 -WorkerSize "Small"
#To create the WebApp
New-AzWebApp -Name "$location-site" -ResourceGroupName $ResourceGroup -Location $Location -AppServicePlan $ASPService
}
#Open the index.html, search for "on featured" on line 66 and change it to "EastUS Region" and then run the following
Compress-Archive -Path "$EastUSfiles\*" -DestinationPath "C:\Temp\$location1.zip" -Update
#Open the index.html, search for "on featured" on line 66 and change it to "WestEurope Region" and then run the following
Compress-Archive -Path "$Europefiles\*" -DestinationPath "C:\Temp\$location2.zip" -Update
#To publish the zip files you've created before
Publish-AzWebapp -ResourceGroupName $ResourceGroup -Name "$location1-site" -ArchivePath "C:\Temp\$location1.zip" -Force
Publish-AzWebapp -ResourceGroupName $ResourceGroup -Name "$location2-site" -ArchivePath "C:\Temp\$location2.zip" -Force
You can find the test website on my github page.
This code will create two web pages containing the following information:

Figure 2: EastUS Website 
Figure 3: West Europe Website
And a set of resources, two app services and two app services plan in each region:

 3.2 – Deploying Azure Front Door
First of all, let’s add a new Front Door instance by searching for “Front Door” and clicking on the icon below. After that, hit “add” in the next screen:

In the basics section, you basically have to select the subscription, the resource group, and the region, which is locked to the same region as your resource group. It will let you choose the region only if you are creating a new Resource Group from this screen.
Here we’ll start configuring the three main components of Azure Front Door, Frontend, Backend and Routing Rules:
3.2.1 – Frontend Pool
Click on the “+” symbol at the Frontends/domains section to open the following tab:
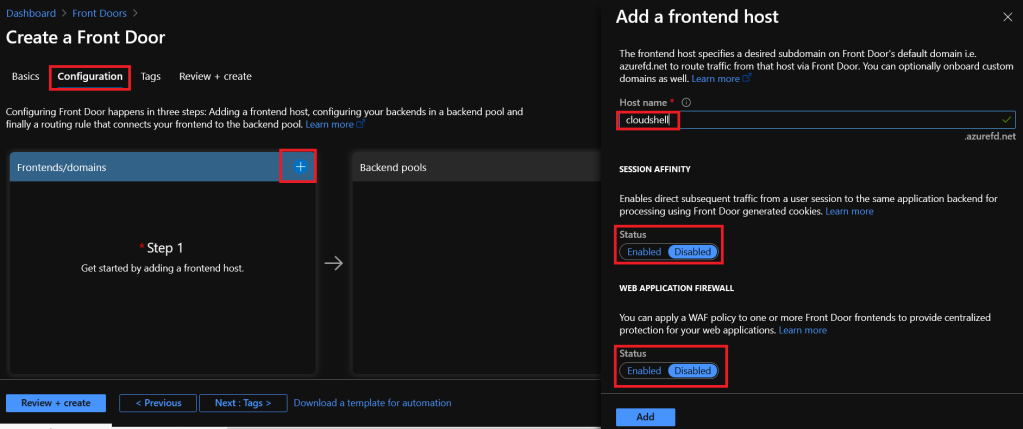
Start giving it a name for you to connect to the FD instance. In this demo we won’t use Customs domains, so our URL will be cloudshell.azurefd.net.
Session Affinity – Enable it if you want a user to be stick to the same application backend every time this user sends a request to the Front Door;
Web Application Firewall – Protects you against malicious attacks and inspect every incoming request delivered by Front Door at the network edge. For demonstration sake, we won’t activate this feature;
3.2.2 – Backend Pool
Go to the purple square and hit the plus symbol:

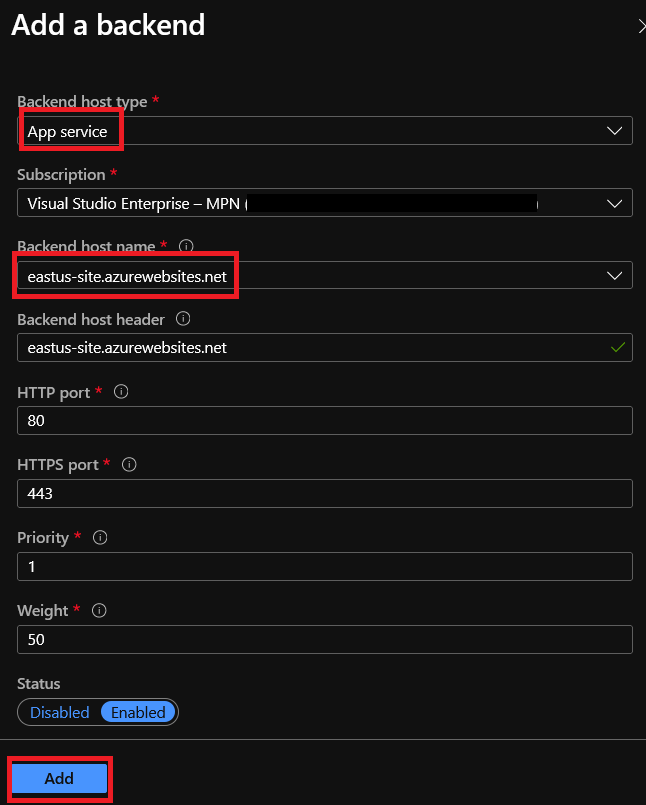
Give a name to your Backend Pool that helps you to remember in the future which backend you are working with. Click to “Add a backend“:

Here you have to select the following:
Backend Host Type – You can choose between many services, it includes:
- App Services;
- Cloud Services;
- Storage;
- Application Gateway;
- API Management;
- Public IP Address;
- Traffic Manager;
- Custom Host;
In our case, we leave the app service as the option.
Subscription – Subscription name;
Backend Host Name – The hostname or IP address of your backend;
Backend host Header – The host header name to use on your requests. Some azure services request this value to match the target host name;
Http Port – In case you want to change the default port ;
Https Port – In case you want to change the default port;
Priority – Some backend resources may have more priorities than others, in case where you need to use one backend as primary and other as a backup, you can set this here;
Weight – You can set the weight of your backend hosts to direct more traffic to one or another;
Status – To start this backend as Enabled or Disabled. This would be useful when you are still preparing the backend but you already added to the front door configuration.
After configuring everything, click “Add“:
You have to do the same with the West Europe website. After that, you’ll get the following result:

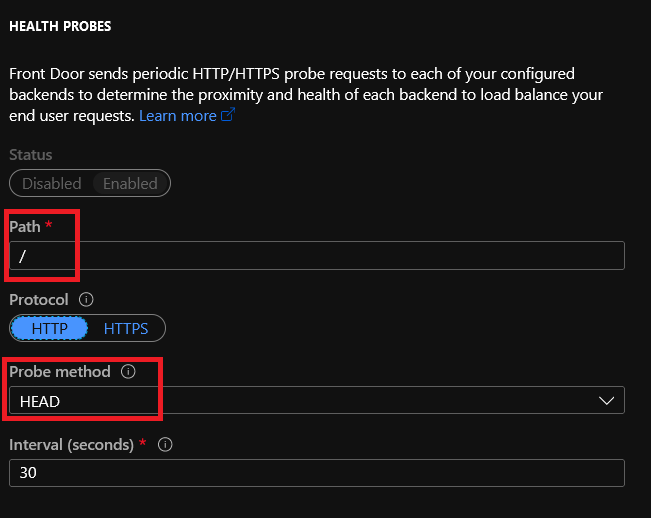
Now it’s time to configure the Health Probes. Let’s see how to configure this:
Path – Relative path of the probe. The valid path starts from ‘/’;
Protocol –
- HTTP – it’s recommended for testing purposes, and to decrease the SSL burden you have when you’re using a certificate.
- HTTPS – Recommended for production environments;
Probe Method –
- GET – The GET method means retrieve whatever information (in the form of an entity) is identified by the Request-URI.
- HEAD – The HEAD method is identical to GET except that the server MUST NOT return a message-body in the response.
Interval – The interval to check the backend Pools;
Load Balancing Configuration:
- Sample size – Identifies how many samples of health probes we need to consider for backend health evaluation.
- Successful sample size – Defines the sample size as previously mentioned, the number of successful samples needed to call the backend healthy.
- Latency sensitivity (additional latency) – Defines whether you want Front Door to send the request to backends within the latency measurement sensitivity range or forward the request to the closest backend.

3.2.3 – Routing Rules
Go to the green square and hit the plus symbol:
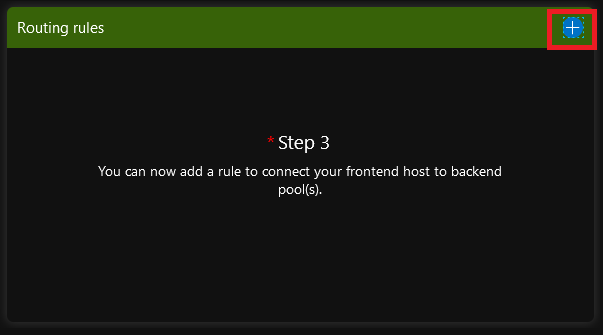
Provide the Routing rule with the following information:
Name – Routing Rule name;
Status – Enabled or Disabled, when you want to create a rule but not activate it immediately;
Accepted Protocol – Because we are using Azure’s certificate, we will use HTTPS only, but you can also use HTTP if you want to;
Frontend/domains – The frontend configuration you have configured before;
Patterns to Match – To match a specific URL/URLs if you need this feature;

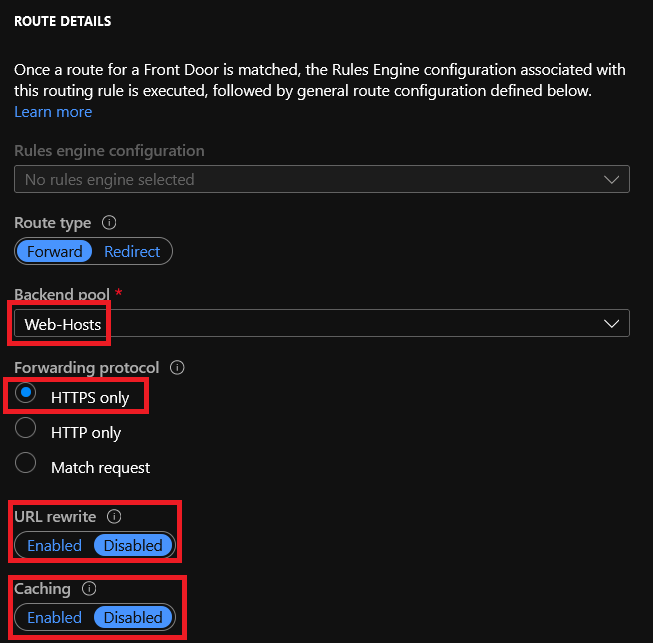
To finish the routing rule, we have the route details to be configured:
Rules Engine configuration – Rules Engine allows you to customize how HTTP requests are handled at the edge and provides more control of the behavior of your web application. We won’t create a Rule engine on this tutorial to keep this simple;
Route Type –
- Forward – To forward to a backend;
- Redirect – To redirect the user to a specific URL
Forwarding Protocol – Protocol to be used on the forwarding. Here we are using HTTPS only;
URL Rewrite – If you want to use URL rewrite, enable this option and then provide the Custom Path;
Caching – If you enable this rule, Azure Front Door will cache the clients with the static content;
The final result will look like this:

We are all set, all we have to do is to go to the “Overview” tab and click on the Front Door link:

And when I try to access that link:
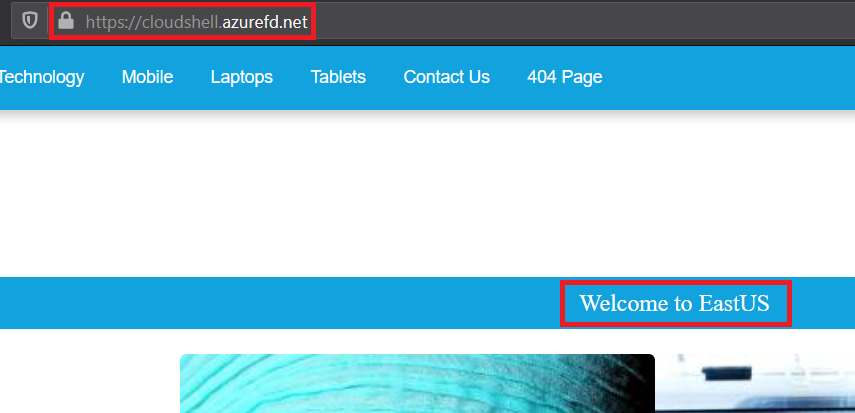
I’m redirected to the app service that has the best latency for my location, in this case, EastUS. Note that the HTTPS worked as well, because we are using a certificate provided by Azure.
 (Optional) Deploying Azure Front Door with Powershell
Here we have the ability to set Front Door entirely by using Powershell. Don’t forget to run the 3.1 step before running it, because we need to have both app services created to add them to the Front Door:
#First of all, we have to install the Az.FrontDoor Module
if(-not (get-module az.FrontDoor -listAvailable)){
    Install-Module -Name Az.FrontDoor -Force
}

$ResourceGroupName = "test-frontdoor"
$routingRuleName = "HTTPS-Rule"
$frontDoorName = "cloudshell"
$FrontendEndpointName = "cloudshell"
$backendpoolname = "web-hosts"
$hostName = "$FrontendEndpointName.azurefd.net"


#To create two backend objects using our Web Apps

$backEnd1 = New-AzFrontDoorBackendObject -Address "eastus-site.azurewebsites.net"
$backEnd2 = New-AzFrontDoorBackendObject -Address "westeurope-site.azurewebsites.net"

#To create a new Health Probe setting object

$WebHostsHealthProbeSetting = New-AzFrontDoorHealthProbeSettingObject -Name "WebHostsHealthProbeSetting"

#To create a Load Balancing Setting object

$WebHostsLoadbalancingSetting = New-AzFrontDoorLoadBalancingSettingObject -Name "WebHostsLoadbalancingSetting"

#To create a new Front Door frontend object

$CloudshellfrontendEndpointObject = New-AzFrontDoorFrontendEndpointObject -Name $FrontendEndpointName  -HostName $hostName

#To create an Azure Front Door backend pool object

$BackendPool = New-AzFrontDoorBackendPoolObject -Name $backendpoolname `
    -FrontDoorName $frontDoorName `
    -ResourceGroupName $ResourceGroupName `
    -Backend $backEnd1, $backEnd2 `
    -HealthProbeSettingsName "WebHostsHealthProbeSetting" `
    -LoadBalancingSettingsName "WebHostsLoadbalancingSetting"


#To create an Azure Front Door routing object

$RoutingRule = New-AzFrontDoorRoutingRuleObject -Name $routingRuleName `
    -FrontDoorName $frontDoorName `
    -ResourceGroupName $ResourceGroupName `
    -FrontendEndpointName $FrontendEndpointName  `
    -BackendPoolName $backendpoolname


#To Create a new Azure Front Door

$AzureFrontDoor = New-AzFrontDoor -Name $frontDoorName `
    -ResourceGroupName $ResourceGroupName `
    -RoutingRule $RoutingRule `
    -BackendPool $BackendPool `
    -FrontendEndpoint $CloudshellfrontendEndpointObject `
    -LoadBalancingSetting $WebHostsLoadbalancingSetting `
    -HealthProbeSetting $WebHostsHealthProbeSetting
$AzureFrontDoor

start-sleep 20

start $hostname
Note that everything is an object, each step is to create a piece to pass them to the last command and finally run the Front Door creation in the end of the script. You will have the same result as if you had created using the portal.
For additional references for this product, please refer to its documentation.
In this post, you’ve learned how to deploy a basic Azure Front Door. If you liked it or if you have any questions, let us know in the comments section.
